Wednesday, March 27, 2013

Chocolate Babka

If I had more blogging self-control, I would just post this picture with the link to the recipe and say no more, because this picture says it all. But obviously I can't not talk about chocolate babka.


Look at those chocolatey-cinnamoney swirls. And a streusel topping! My parents call me their "dealer" (because sugar is their drug) and when I'm home they refer to my baking delights as "getting their fix."


Unfortunately I halved the recipe so this fix went reallyy quickly. Obviously I followed this recipe from The Smitten Kitchen, since who else would I trust when making a jewish/chocolate dessert?


I almost don't want to tell you this because then you may never experience the joys of making babka yourself, but it took me about four hours from when I started with heaping amounts of ingredients to when I was sitting on the couch, butter-slathered piece of warm babka in my hand (because naturally, using two and a half sticks of butter in a recipe isn't enough for me!) Though that time commitment definitely sounds daunting, there's a lot of rising time for the dough. Which means more time for you to do other important things, like watch a Real Housewives of Beverly Hills marathon, or paint your toes.


I don't love the lighting of this pic (I'm still working on my photography skills, the Nikon is a lot different than my baby Sony Cybershot), but I had to post it because you can see all the doughy crevices and the texture of the crumbly topping. This recipe really turned out perfectly. Like if I had to change a thing I would double the recipe and freeze some of the loaves for holidays or give some of them as gifts. Because really, who wouldn't want a loaf of glorified brioche stuffed with chocolate swirls topped with buttery streusel?

P.S. I promise that the next post (or maybe the one after that, I still have one more waiting in the wings) will include a recipe that I develop, enough of this linking-to-other-peoples-blogs four times in a row.

Monday, March 25, 2013

Chocolate Hazelnut Crepe Cake


If you haven't heard of a crepe cake, or a mille crepe cake (made famous by the Lady M bakery in Manhattan), then you're in for a treat.


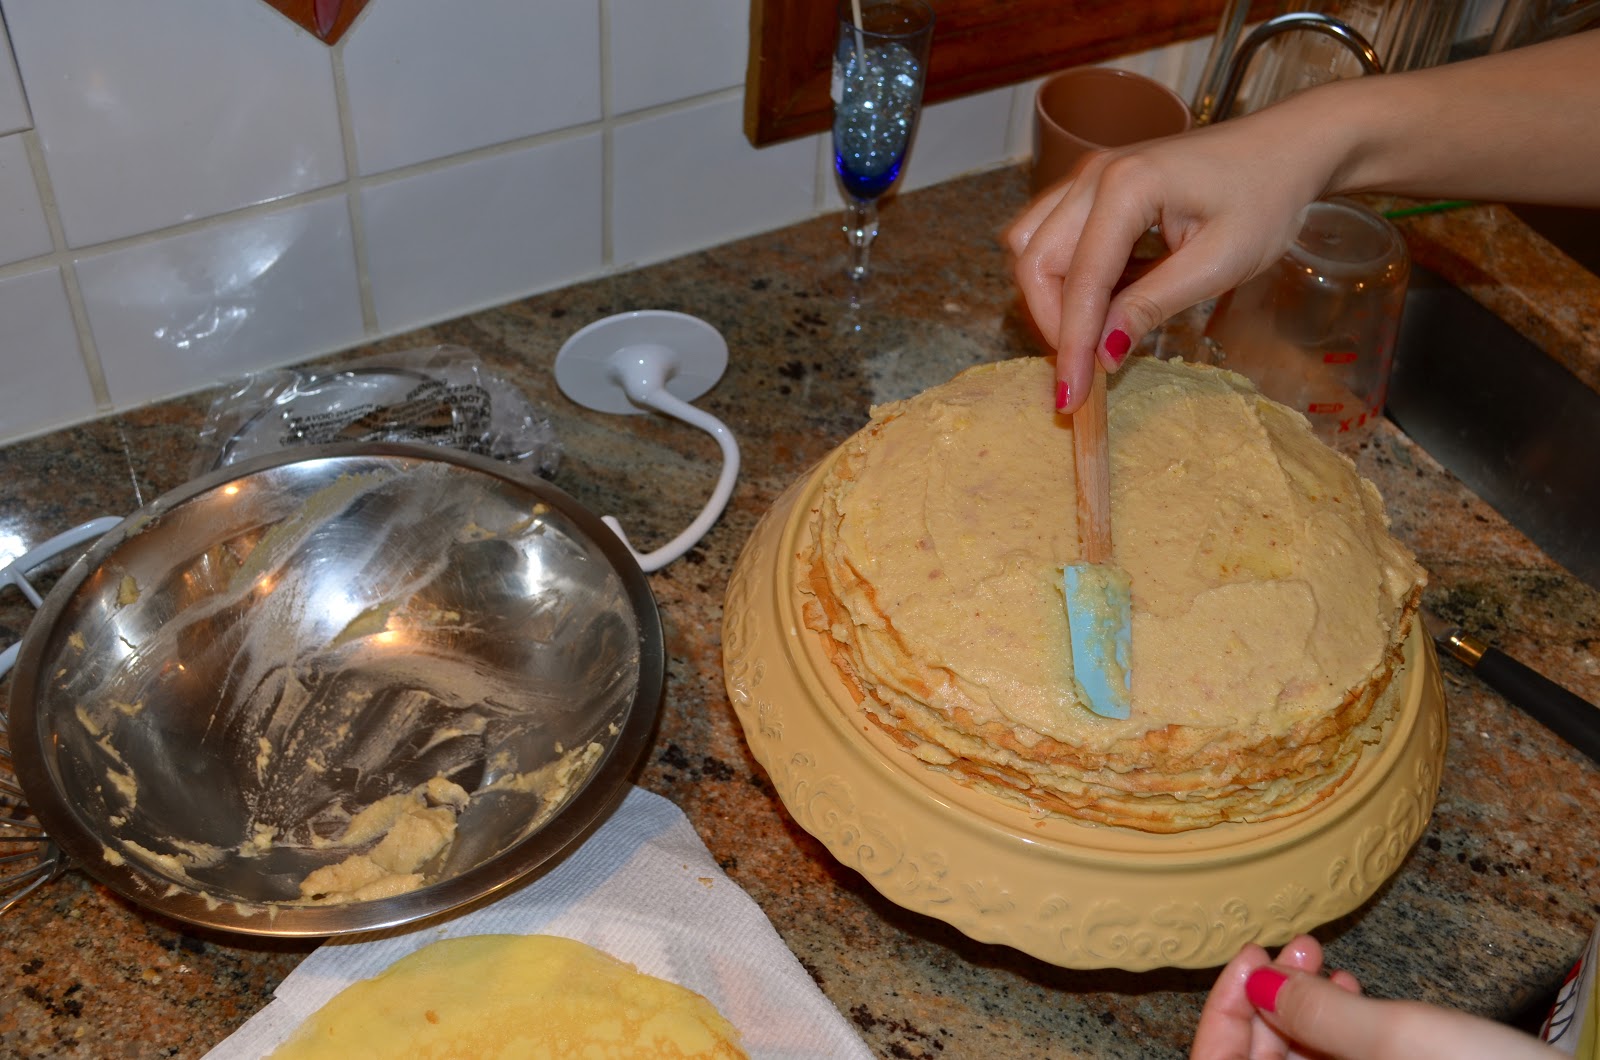
As you can see, it's layers of crepes stacked together with cream in between each layer. What you can't see is that the crepes are brown-buttery and light-as-air, and the cream filling is a hazelnut pastry cream.  All topped with a semi-sweet chocolate ganache. Yeah. It's serious stuff.


It took a while for my hazelnuts to turn into the clumpy powder that they needed to be for the pastry cream, but besides that it was fairly simple to make.


My baking style is a bit haphazard, so sorry for all of the things in this picture. Once you make the crepes (I ended up with around 18 after eating two that had "broken") it's time to stack them up with the pastry cream.


Ta da! How pretty is that?? And no baking required! This cake isn't super sweet, so if you have a major sweet tooth (like me), then you'll find yourself wishing that it was filled with alternating layers of nutella and marshmallow fluff. But hey, that's just me. You can find this wonderful recipe in the The Smitten Kitchen Cookbook. If you haven't heard of The Smitten Kitchen, then I'm doing you a favor. Go click on over and soak up all the perfectly-crafted recipes that Deb (it's creator) has to offer.

Monday, March 18, 2013

Samoas Salted Caramel Ice Cream

I feel bad doing this.


Dropping such a decadent dessert in your lap so early in the week, when you're likely still trying to stick to some healthy eating plan. Desserts like this should really be eaten on Friday nights, after making it through a long week of salads and diet ice cream bars. But I've never been good at waiting.


I'm sure that you, like me, have been bombarded by the adorable little diet-ruiners (aka Girl Scouts) selling their wares outside of every. single. supermarket. When I'm home, I go to the supermarket at least every other day (I don't always make lists and tend to forget pretty crucial ingredients. Like flour, or butter). Every time I leave the store, there are hoards of little girls in green vests trying to get me to buy a box (or 12) of cookies. I usually try to avoid eye contact and keep my head down, which has worked for me this year. Unfortunately, my mom got suckered into buying a couple of boxes (from my adorably cute cousin, I should add) and so this ice cream was born.


Because what goes better with caramel-chocolate-coconut cookies than a salted caramel custard? This ice cream is hands-down the most rich and creamy ice cream that I've ever eaten. I followed this recipe, except next time I would double the salt and leave out the last 1/4 cup of sugar. It's plenty sweet, especially when you add chewy chunks of cookies (I added 7 cookies, chopped up). Also, a word of advice, if you've never made caramel before, don't worry. It's really easy, you just need to watch it like a hawk because the caramel can go from a delicious perfect amber to burnt sugar in a second. And no one wants burnt sugar flavored ice cream.

Thursday, March 7, 2013

Stuffed Cheesy Pepperoni Bread

I need to tell you all something. It's cheesy and buttery and herby and too good to be true.


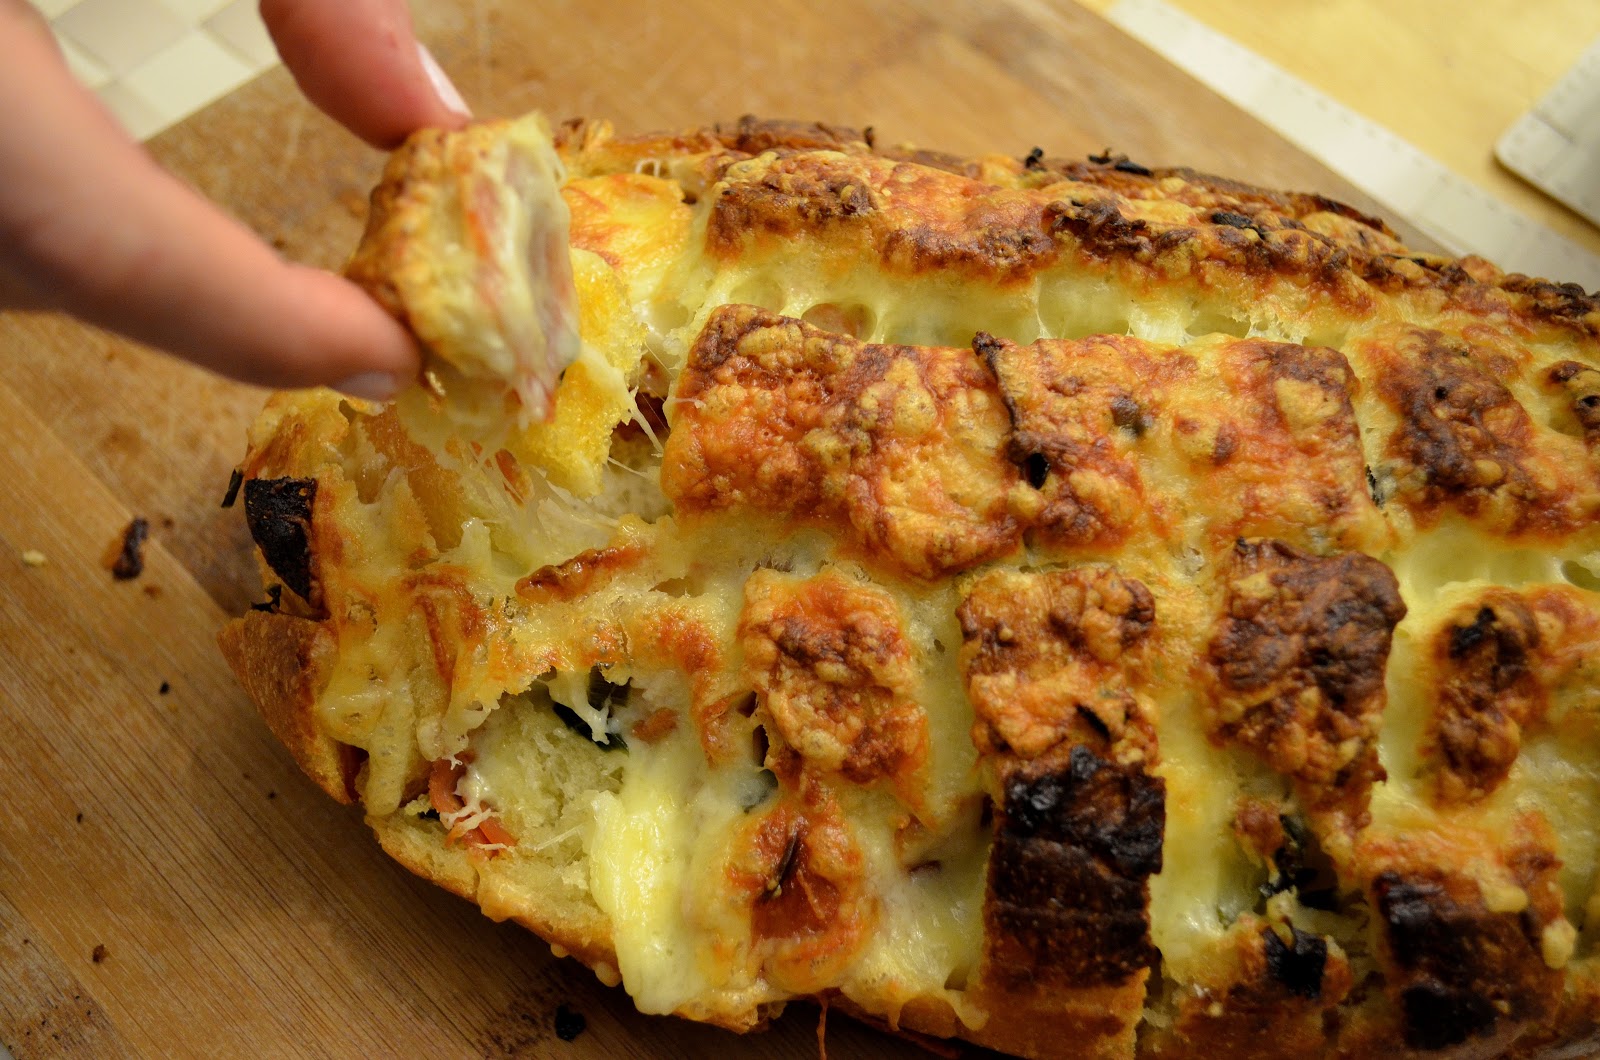
This stuffed cheesy bread is crisp and toasty on top and buttery and and gooey in the middle. It's every carboholic's dream (or every Atkins-follower's nightmare - but who does Atkins anymore anyway?) The ingredient list can be a bit overwhelming (I do NOT want to know the amount of fat grams in this loaf) but just pretend that butter and cheese are healthy for a sec and indulge yourself.


Look. At. It. If that's not food porn then I don't know what is.


Another photo, ya know, just in case you weren't convinced. If you're still not convinced, I can't help you. You're a bread-and-cheese-loathing human. And I'm sad for you. The recipe my friends and I followed was adapted from Food Wanderings in Asia. We subtracted the dijon mustard, poppy seeds, parsley and added sliced pepperoni and scallions. Next time I'm thinking of using brie as the cheese and caramelized onions as the accoutrements, or maybe I'll melt the butter with an apricot jam and let that soak up in all the nooks and crannies. SO many possibilities. Guess I'll just have to make it again this weekend!

The loaf took four people six minutes to finish, which I'm not sure if that's impressive or repulsive. You can decide for yourself when you make it (I'm thinking it's impressive..)


Fin.

Tuesday, March 5, 2013

Chocolate Chocolate Chip Donuts with a Marshmallow Glaze


So the glaze isn't as photogenic as I would have hoped. But it tastes like the most delicious marshmallowey-rice-crispy-treat-glue, so I got over it.


You may have guessed, by looking at these here donuts, that I bought a donut pan! So many other bloggers were raving about cakey baked donuts and how easy it is and blah blah and I was jealous. So I placed my order and 5 quick days later I was testing it out.


Except that my first try (see above) at a vanilla cake donut did not turn out as expected. Before I try out any recipe I peruse through the food blogosphere to see if others have tried it, how it turned out, etc. Anyway, this recipe seemed to be the go-to recipe for vanilla donuts. So maybe I messed something up? I don't know. The recipe called for only 2 tbsp of butter for about 12 donuts and that seemed wrong but I didn't question it. And guess what? They were super dry. Like needed to be dunked into milk for at least 15 seconds in order to be able to swallow.


But they were pretty, and fun to make glazes for. The chocolate one is a standard ganache with some added cocoa powder, and the other one is a maple cinnamon glaze (aka confectioner sugar mixed with maple syrup, some milk and cinnamon). But back to the chocolate donuts. They're deeply chocolatey with pockets of melted chocolate chips, and they stay good for at least two days. Not that they'll last that long..

Chocolate Chocolate Chip Donuts with a Marshmallow Glaze
adapted from Mama's Gotta Bake
(makes around 15 donuts)
Ingredients:
1 3/4 c. all-purpose flour
2/3 c. unsweetened cocoa powder
1 1/4 c. brown sugar
1 tsp. baking powder
1 tsp. baking soda
3/4 tsp. salt
1 c. semi-sweet chocolate chips
2 large eggs, at room temperature
3/4 c. milk
2 tsp. vanilla extract
2 tsp. vinegar, white or apple cider
1 stick (8 tbsp.) butter, melted
1 c. mini marshmallows
2 tbsp. butter

Preheat oven to 350 degrees F. Grease the donut pan, set aside.

In a medium sized bowl, combine the dry ingredients and the chocolate chips. Set aside.

In a large bowl, whisk together the eggs, milk, vanilla, and vinegar. Slowly add the dry ingredients, along with the melted butter, to the wet. Mix to combine, but don't over-mix.

You can either spoon the batter into the pan, or put it into a ziplock bag, cut off the tip and pipe it in (this was easier for me, though since the batter is thick it's not much of a problem either way.) Fill each donut well around 3/4 of the way full.

Bake the donuts for around 13-15 minutes, or until a toothpick inserted into the center comes out clean. Flip pan over and allow donuts to cool on a wire rack.

To make the marshmallow glaze, put marshmallows and butter in a small saucepan over low heat. Cook until marshmallows have melted and are a thick, liquid consistency. Spoon/drizzle over donuts. The glaze will become slightly tacky when cool, so plan on eating right away or wait to glaze the donuts until just before serving.

Tuesday, February 19, 2013

Homemade Pappardelle with Bolognese Sauce

Homemade pasta.


It's a lot easier than you think. I didn't even have a pasta machine. Or a rolling pin (we'll get to that later).


 What I did have was some fancy Italian flour from Fairway that my mother sent to me via my boyfriend, who came to visit just in time for Valentine's Day and homemade pasta. He's a lucky guy.


The first time I made pasta was almost exactly a year ago. Last Valentine's Day, while I was in Rome, I took a cooking class and we made tagliolini all'amatriciana. I haven't attempted to recreate the dish since then, so I figured it was time to try my hand at pasta-making without a very skilled Italian chef leading the way.


Except that I wanted pappardelle bolognese, like what I had when I was in Tuscany. Since I had never made pappardelle before, I followed Michael Chiarello's recipe. I halved it, since I was only cooking for my boyfriend and me, but I almost instantly regretted that because now I don't have a ready-to-shape ball of pasta dough in my freezer waiting for me. I would suggest making the full recipe.


This meal is super easy and doesn't nearly warrant as much praise as it receives. The bolognese is simple and hearty and can be made far in advance or just before (I made mine a couple of hours before serving so that the flavors had plenty of time to meld together).


Remember that rolling pin I told you I didn't have? Right. So I used a can of Pam Spray (except it's not even the brand name kind, that's too much of a splurge for a college budget). As per expected, this method of rolling pasta didn't yield quite as thin a sheet as I would have liked, but it was no less delicious.


I could have gotten all fancy and measured out the width of each individual noodle, but I chose to cut them freeform instead. Some were thinner and some were definitely thicker, but who cares when they're smothered in sauce and cheese?


Classic Bolognese
(makes 4 servings)
Ingredients:
1 lb meatloaf mix ground meat (trio of ground veal, pork, and beef)
2 tbsp. olive oil
1 medium onion, diced
1 medium carrot, diced
1 stalk celery, diced (you can add more, I don't love celery)
1 c. chicken stock
1 c. red wine
1 28 oz. can crushed San Marzano tomatoes
2 tbsp. tomato paste
1 tsp. dried parsley
1 tsp. dried oregano
salt and pepper to taste

In a large sauce pot, heat olive oil over medium heat. Add diced vegetables and cook until tender. Add meat and begin to brown, making sure to break up the larger pieces.

Add chicken stock and simmer for 10 minutes, or until most of the liquid has cooked off. Add wine and simmer until liquid has cooked off.

Add crushed tomatoes and let simmer for 20 minutes, until the sauce has thickened up. Add herbs, tomato paste and salt and pepper. Let sauce simmer for another 20 minutes. At this point it is ready to serve, though it'll only get better the longer it sits. I usually cover it and leave it on the stove, that way it's ready to warm up once the pasta is done.

*A quick note about Chiarello's pasta recipe: you cook the pasta for around 4 minutes, though taste it as it's cooking to make sure. I'm not sure why he doesn't include cooking instructions, since cooking fresh pasta is timed differently than dry pasta.

** Another note about these pictures! As you can see, my hands are elbow deep in pasta dough in most of them, which means that I was not the sole photographer. My best friend/very talented photograhpher Rachel took pictures 2, 3, and 4. My wonderfully helpful boyfriend Chris took pictures 5 and 6, and I photographed the rest.

Wednesday, February 6, 2013

Chubby Chewy Chocolate Chip Cookies

Ah, alliteration.


But really, look at them. They're totally chubby, and I will tell you from having eaten almost all of them at an astounding rate that they are indeed chewy. These cookies were the product of an impromptu sugar craving that swedish fish and sugar-free hot chocolate would not squelch (as a side note, those are not my go-to sugary snacks, they were just the only things to be had in my food-scarce apartment). Sometimes, nothing but fresh baked goods will suffice.


But seeing as I had no butter or white sugar on hand, these cookies stray a bit from the usual. I expected them to be totally flattened out and lackluster without the butter, but I was happily surprised. These cookies are puffy and light, with a gooey chocolatey center. Are they perfect? Definitely not (I'd prefer a crispy, buttery cookie any day). But if you're stuck in a butter-less predicament like I was, these are a respectable rendition.

Chewy Chocolate Chip Cookies
(makes 18 large, or 24 regular sized cookies)
Ingredients:
2 1/2 c. all-purpose flour
1 1/5 c. brown sugar
1 tsp. baking soda
1/2 tsp. salt
1 c. vegetable oil
2 eggs
1 tsp. vanilla extract
2 c. chocolate chips

Directions:
Preheat oven to 350 degrees F. Line a baking sheet with parchment paper, set aside.

Combine dry ingredients in a medium bowl, set aside.

In a large bowl, combine brown sugar and oil, mixing well until no clumps remain. Add eggs, beating well after each addition. Stir in vanilla. Slowly incorporate dry ingredients, making sure not to over mix. Fold in chocolate chips (I used a mix of semi-sweet mini chips and regular sized chips, though next time I might use chocolate chunks or discs).

Bake for 8 to 10 minutes, or until cookies are golden brown and puffed. Transfer to wire rack and allow to cool.